Tag Archives: Games programming

Let’s write a twin stick shooter using Basic4Android – Part 1

Twin stick shooters work great for phones and tablets, your thumbs stay out the way of the action, and it feels very familiar if you’re used to using a Playstation or Xbox pad. Luckily, it’s pretty easy to write a twin stick shooter game using Basic4Android, I’ve written the following series of posts and Youtube videos to go from nothing to a twin stick space shooter. I start with getting the sticks on screen, then move on in easy steps, add the sticks, add a background, add a player, add some enemies, shoot the enemies, make the enemies shoot you, add a score, add a highscore table, add a title screen, add some sound effects, add some music, game done! Upload to Play Store and get rich!

Part 1 – Defining and drawing the sticks

Part 1 - screenshot

After this first part, the above screenshot is what you’ll get. Each stick can be controlled, and both sticks can be controlled at the same time.

So let’s get coding!

Download the project file here:

https://dl.dropboxusercontent.com/u/8673694/you%20tube%20files/basic4android/games%20programming%20tutorials/Twin%20stick%20shooter%20-%20part%201.zip

First off, check you’ve got the right software, for this series you’ll require the full paid version of Basic4Android, I’m using version 5.01, but I have tested this on version 3.8, so anything above that version should be fine.

You’ll also need the LibGDX library, available here: http://www.b4x.com/android/forum/threads/libgdx-game-engine.32594/

The current version as I write this is version 1.07.

Once you have Basic4Android installed, copy the contents of the libgdx zip file into your additional libraries folder (set this up using the tools/configure paths option), then you’re ready to go.

In this first part, we will get the sticks to appear on screen, and be able to move them by touching the screen, we will also make sure they work with two fingers at once, a twin stick shooter’s not much good if you can only use one stick at a time!

I’ll work through the code, one section at a time to keep it simple, you can also watch me explain this on Youtube here: http://youtu.be/Z7PFeEbqWiA

#Region Project Attributes 
 #ApplicationLabel: Twin Stick Shooter
 #VersionCode: 1
 #VersionName: 0.01
 #SupportedOrientations: landscape
 #CanInstallToExternalStorage: False
#End Region

Starting with the Project attributes region, we call the application “Twin Stick Shooter”, this is what the game is called on your Android launcher.

We”ll start at versioncode 1 (this must be a whole number), then a versionName 0.01, we’ll increase this as we work through.

Set the supportedOrientations to landscape, we won’t support portrait for this game (however it would be very simple to support it)

CanInstalltoExternalStorage leave this as false for now.

Next comes the Activity attirbutes:

#Region Activity Attributes 
 #FullScreen: True
 #IncludeTitle: False
#End Region

Set fullscreen to true and get rid of the title bar.

We have nothing in the Process_Globals region, however the Globals section will take some explaining:

Dim surface As View ' main view to hold libGDX surface
 Dim vpW As Float = 1134 'set view port width in pixels
 Dim vpH As Float = 720 'set view port height in pixels
 Dim lGdx As LibGDX ' declare libgdx to load library
 Dim GL As lgGL ' declare opengl
 Dim Camera As lgOrthographicCamera ' declare camera type
 Dim Batch As lgSpriteBatch ' set up sprite batch for main loop
 Dim GdxIP As lgInputProcessor 'declare libgdx input procssor
 Dim movevector As lgMathVector2 ' declare movevector to store move stick data
 Dim firevector As lgMathVector2 ' declare firevector to store firestick data
 'define type to store thumbstick, x and y are coords of stick on screen, dx and dy show how far the stick is being pushed, width and height are just for screen scale
 Type typthumbstick(x As Float, y As Float, dx As Float, dy As Float, diameter As Float, radius As Float)
 'declare right thumbstick - used for firing
 Dim rStick As typthumbstick
 'declare left thumbstick for movement
 Dim lStick As typthumbstick
 Dim tOrXR As Float 'right stick original touch x value
 Dim tOrYR As Float 'right stick original touch y value
 Dim tOrXL As Float 'left stick original touch x value
 Dim tOrYL As Float 'left stick original touch y value
 Dim movePointer As Int = -1 'used to store which finger is on move stick
 Dim firePointer As Int = -1 'used to store which finger is on fire stick
 'declare images
 Dim img_thumbstick As lgTexture 'thumbstick centre

Okay, let’s get through it, the comments pretty much say it all, but I’ll explain what I think might be a bit confusing.

A viewport is basically the screensize in pixels you are defining for your game to use, libgdx will scale the graphics for all phone screens though, so things will still look smooth on all screen sizes, but at least we know what coordinates system we have, so here we set the viewport width and height. This means that we know top top coord for the screen is 720 and the width is 1134 pixels wide for every phone the game is played on.

Vectors, which we declare for movement and firing are objects which store several things, for us, we use them to store a direction and power value, so from one vector on the sticks, we can tell what angle the player is pushing the stick, and how much they are pushing it. This lets you do cool things like in Mario where you can walk or run the character based on how hard the player is pushing the stick. Mario 64 in the N64 was the first game to do that.

We then define the type for our sticks, each stick created from this type has an X and Y position on the screen, a DX and DY value to show how off centre it is when in use, a diameter and a radius.

We then define our right and left sticks on the next lines.

The next four lines are to store the starting coords of the sticks when the player moves either one, it makes it easier to calculate the vector size to apply to moving the player or shooting later on.

Then we define the move and fire pointers. Everytime you put your finger on the screen, that finger gets given a value, so based on where you place your finger, we will assign this to either the move or the firepointer, that way we know which joystick to reset when you lift a finger off the screen.

We then finally define an lgTexture object to store our stick image. This is a file in the files folder in the project folder.

Now all that’s done, lets start making things happen.

Sub Activity_Create(FirstTime As Boolean)

 'Initializes libGDX
 surface = lGdx.Initializeview("LG")
 Activity.AddView(surface, 0, 0, 100%x, 100%y) ' fill screen
 GdxIP.Initialize("IP")
 
End Sub

We setup libgdx and fill the screen with it. We then initialise the object for getting input for the player touching the screen.

Sub Activity_Resume
 'Informs libGDX of Resume events
 If lGdx.IsInitialized Then lGdx.Resume
End Sub

Sub Activity_Pause (UserClosed As Boolean)
 'Informs libGDX of Pause events
 If lGdx.IsInitialized Then lGdx.Pause
End Sub

Resume and pause simply call the resume and pause libgdx methods.

Sub LG_Create
 'Initializes the renderer
 Batch.Initialize ' initialise batch for drawing graphics in main loop
 'load Graphics
 img_thumbstick.Initialize("thumbstick_white.png")

We now initialise the batch object used for drawing the images in the main game loop, then we load the png image against the img_thumbstick texture.

Now we setup the sticks:

'initialize thumnbsticks
 'right stick
 rStick.x = vpW*0.8
 rStick.y = vpH*0.2
 rStick.dx = 0
 rStick.dy = 0
 rStick.diameter = 150
 rStick.radius = rStick.diameter/2
 
 'left stick
 lStick.x = vpW*0.2
 lStick.y = vpH*0.2
 lStick.dx = 0
 lStick.dy = 0
 lStick.diameter = 150
 lStick.radius = lStick.diameter/2

we set the positions of each stick using the screen percentage amounts, this should put them roughly in the same positions on all screen sizes, but you could write an options screen to allow players to move the stick positions. We then set the movement to zero to start, then set the diameter of each stick.

It’s worth noting at this point, that we can set the sticks to any point on the screen and any size, and this code will all still work without having to change anything else.

Sub LG_Resize(Width As Int, Height As Int)
 'Sets the camera viewport
 Camera.Initialize
 Camera.SetToOrtho2(False, vpW, vpH) 'set camera viewport to viewport size vpW by vpH
End Sub

The resize method gets ran every time the orientation changes or every time the app runs. It initialises the camera, then sets the viewport to use the vpw and vph variables we set earlier so we know what coordinates we’re using on all phones.

Let’s look at the render region:

Sub LG_Render
 'Clears the screen
 GL.glClearcolor(0,0,0,1) 'RGB,alpha - Clear screen with color based on values 0 to 1 for red, green, blue and alpha
 GL.glClear(GL.GL10_COLOR_BUFFER_BIT)
 'Updates the matrices of the camera
 Camera.Update
 'Uses the coordinate system specified by the camera
 Batch.ProjectionMatrix = Camera.Combined

 'draw game
 Batch.Begin
 
 #Region draw controls
 'draw controls
 'draw left thumbstick
 Batch.DrawTex2(img_thumbstick,lStick.x-lStick.radius+movevector.x,lStick.y-lStick.radius+movevector.y,lStick.diameter,lStick.diameter)
 'draw right thumbstick
 Batch.DrawTex2(img_thumbstick,rStick.x-rStick.radius+firevector.x,rStick.y-rStick.radius+firevector.y,rStick.diameter,rStick.diameter)
 #End Region
 
Batch.End
#End Region
End Sub

Keeping it simple, it clears the screen, then starts the drawing batch section, this render region is called every time the screen refreshes, which on most phones is 60 times per second.

So we draw the thumbsticks. the reason we don’t just draw them at their x and y coords is due to libgdx drawing the texture to the right and above of the coordinate, making the x and y coords the bottom left corner of the image, so we shift everything by half the image size when we draw it.

Sub IP_touchdown(screenX As Int, screenY As Int, pointer As Int)
 screenX = vpW * (screenX / lGdx.Graphics.Width) 'translate x coord
 screenY = vpH - (vpH * (screenY / lGdx.Graphics.Height)) 'flip and translate Y coords
 'check lstick
 If (screenY < lStick.y+lStick.radius) And (screenY > lStick.y-lStick.radius) Then
 If (screenX > lStick.x-lStick.radius) And (screenX < lStick.x+lStick.radius) Then 
 movePointer = pointer
 Log("set movepointer to " & pointer)
 tOrXL = screenX
 tOrYL = screenY
 End If
 End If
 
 'check rstick
 If (screenY < rStick.y+rStick.radius) And (screenY > rStick.y-rStick.radius) Then
 If (screenX > rStick.x-rStick.radius) And (screenX < rStick.x+rStick.radius) Then 
 firePointer = pointer
 Log("set firepointer to " & pointer)
 tOrXR = screenX
 tOrYR = screenY
 End If
 End If
 
 'sector map icon
 Log(screenY)
 
 #End Region
 
End Sub

The next few regions can be ignored as there’s no code for us to worry about, let’s look at the touchdown region. This runs everytime a finger is placed on the screen. We first translate the coords to match the screen cordinates we’re using from our vpw and vph values (remember Android phones have lots of resolutions).

We then set the move pointer and fire pointer based on where the finger presses on the screen, whether it’s within the bounds of either of the sticks.

Let’s move on. I know I’m skimming it a bit, but we’ll never get to the good stuff if I don’t.

Sub IP_touchup(screenX As Int, screenY As Int, pointer As Int)
 'stop moving if move pointer lifted
 If pointer = movePointer Then
 'reset move cursor position
 Log("released movepointer")
 movePointer = -1
 lStick.dx = 0
 lStick.dy = 0
 movevector.x = 0
 movevector.y = 0
 
 End If
 
 'stop firing if firepointer lifted
 If pointer = firePointer Then
 'reset firepointer position
 Log("released firepointer")
 firePointer = -1
 rStick.dx = 0
 rStick.dy = 0
 firevector.x = 0
 firevector.y = 0
 End If
End Sub

If a finger is lifted, this region gets called, if it’s the movepointer finger, then we reset the movepointer value to show it’s not in use, we set the sticks back to the centre, and set the vector to zero to stop moving the player. We do the same things for the firepointer.

Last bit, moving the sticks:

Sub IP_TouchDragged(ScreenX As Int, ScreenY As Int, Pointer As Int)
 ScreenX = vpW * (ScreenX / lGdx.Graphics.Width) 'translate x coord
 ScreenY = vpH - (vpH * (ScreenY / lGdx.Graphics.Height)) 'flip and translate y coord
 
 If Pointer = movePointer Then
 lStick.dx = ScreenX - tOrXL
 lStick.dy = ScreenY - tOrYL 
 movevector.x = lStick.dx
 movevector.y = lStick.dy
 'limit how far the stick can be moved
 movevector.limit(50) 
 End If
 
 If Pointer = firePointer Then
 rStick.dx = ScreenX - tOrXR
 rStick.dy = ScreenY - tOrYR
 firevector.x = rStick.dx
 firevector.y = rStick.dy
 'limit how far stick can be moved
 firevector.limit(50)
 End If
End Sub

Again, we translate the screen coords, then we set the stick dx and dy values by the difference in where your finger is and where it was when you first pressed the screen, we set these values to the movement and fire vectors. We then lastly, use the vector limit function to set the maximum size of the vector, this is useful to stop the player moving too fast, or firing too fast.

Try downloading the project from this link:

https://dl.dropboxusercontent.com/u/8673694/you%20tube%20files/basic4android/games%20programming%20tutorials/Twin%20stick%20shooter%20-%20part%201.zip

and try running it, then try playing with it to change the size of the sticks and where they are on screen, then try changing the size of them.

More tutorials coming later this week!

Write a Flappy Bird clone using Basic4Android and LibGDX–Part 7

In this section we’ll handle displaying text on the screen. In a previous tutorial we updated the score variable, but as yet we’re not drawing that on the screen.

Download the source code here:

https://dl.dropboxusercontent.com/u/8673694/you%20tube%20files/basic4android/CloneyBirdTutorial/Part7.zip

LibGDX uses what are called Bitmap Fonts to display text. What this means ion practice is that we need some font files that are basically just graphics files that have the alphabet, numbers and special characters in them.

These font files can be generated using a free tool like BMFont by AngelCode.

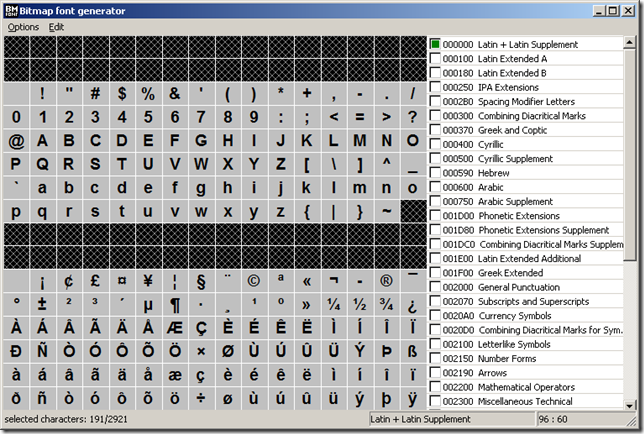
image

The BMFont main screen looks like the above image, this screen shows you all the characters that are going to be saved into your font file.

The “Font Settings” menu option allows you to set which font to use, the size, etc… I’ve added a screenshot showing the settings I’ve used for our Flappy Bird Clone.

image

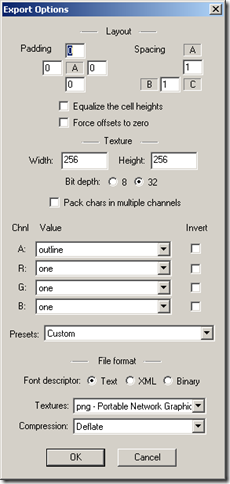
Once you’ve copied those settings, open the export options menu item and copy the following settings:

image

Now simply go to the options menu again and select “Save bitmap font as…”

Then save it into your files folder in your Flappy bird project folder.

It’s probably worth saving the settings using the menu option “Save configuration as….” to save the settings for later use.

Now have our font files ready for use, we can use them in our game.

Returning to your B4A window, add the following code into your globals section:

Dim bitmapfont As lgBitmapFont

This declares an object called bitmapfont that we can use with libGDXs font functions to draw the score and any other text we want to the screen.

In order to work, we also need to tell it what the font file is called for it load it into memory, add the following to your LG_Create section:

bitmapfont.Initialize2(lGdx.Files.internal(“bmfont.fnt”)) ‘ load bitmap font file

Assuming you called your font that name, then this will work, otherwise change the filename to match what you saved your font as from the BMFont application.

We’re almost ready to draw our score. The only problem is the command to draw text to the screen is a little complex if you want to use it many times, like say to draw multiple lines of text for a title screen. The solution is to write a small function that handles it for us so we can just use a short simple command whenever we want to write some text. Add the following command at the very bottom of your source code:

Sub shadowtext(text As String, x As Int, y As Int)
    bitmapfont.Draw2(Batch,text,x-(bitmapfont.GetBounds(text).Width/2),y,bitmapfont.Color.black)
    bitmapfont.Draw2(Batch,text,x-(bitmapfont.GetBounds(text).Width/2)-2dip,y-2dip,bitmapfont.Color.white)
End Sub

This is a function that will accept a string and a set of x and y coordinates. It then uses the bitmapfont.draw2 method to write text to the screen. It also draws the text on the screen with a little offset on x and y to give a shadow effect.

This means we can draw text to the screen by using this function like this: shadowtext(“hello world”,50,,50), which is much easier than having to write bitmapfont.Draw2(Batch,”hello world”,50,50,bitmapfont.Color.black) when ever you want to write text to the screen.

Going back to the LG_Render method, add the following line to draw the score after the command to draw the bird:

shadowtext(“”&score,vpW*0.50,vpH*0.90)

We’ll call that it for this tutorial, in the next tutorial we’ll add sound effects before we add the highscore and title screen. The next tutorial will be the final part.

Write a Flappy Bird clone using Basic4Android and LibGDX–Part 8

So we have our background, our pipes, our ground scrolling, our bird and the score. We have collision detection in place and the game restarts after you die. So what’s left to do before we can call this a real game? Let’s just use this list: High-score, Title screen, sound effects.

Get the source code here!

https://dl.dropboxusercontent.com/u/8673694/you%20tube%20files/basic4android/CloneyBirdTutorial/Part8.zip

We have a score, so we’ll add the high-score first.

In the globals section, we’ll add a variable for the high-score value and then a file object for the score file.

Dim highscore As Int
Dim scorefile As RandomAccessFile

We need to add a new library here too, in the libs tab on your B4A IDE, tick the box next to RandomAccessFile, this gives us the file commands we need to handle the high-score.

Moving to the Activity_Create section add the following to handle the high-score file:

‘create highscore file
If File.Exists(File.DirInternal,”scores.dat”) Then ‘only open if file exists
scorefile.Initialize(File.DirInternal,”scores.dat”,True) ‘ open file
highscore = scorefile.ReadInt(0) ‘read score from file into highscore variable
scorefile.Close ‘ close file after use
Else
highscore = 0 ‘ set high-score to zero if first run
End If

So if the high-score file exists, then B4A will open it and read the integer value at position zero from it into the high-score variable. Otherwise, just set the high-score to zero if no file is found, this will happen the first time the game is played.

At the end of the LG_Render section, we’ll now add the code to write the high-score to the screen if the bird is dead. It will also display the message to flap to restart when the restartCD value drops below zero.

If birddead = False Then
‘if bird alive then just draw score
shadowtext(“”&score,vpW*0.50,vpH*0.90) ‘ draw score on screen
Else ‘otherwise if bird dead
restartCD = restartCD – 1 ‘decrease restartCD
‘write high-score file if new high-score
If score > highscore Then ‘if score higher than high score
highscore = score ‘set high-score to score
‘write high-score to file
scorefile.Initialize(File.DirInternal,”scores.dat”,False)
scorefile.writeInt(high-score,0) ‘write score to file
scorefile.Close ‘close score file
End If
shadowtext(“Score: ” & score,vpW*0.50,vpH*0.80) ‘write score to screen
shadowtext(“High Score: ” & highscore,vpW*0.50,vpH*0.70) ‘write high score to screen
If restartCD < 0 Then ‘if restart timer is less than zero
shadowtext(“Flap to Restart”,vpW*0.5,vpH*0.60) ‘write flap to restart text to screen
End If
End If

To explain this in sections, first, if the bird is alive, then just draw the score to the screen, otherwise, decrease the restartCD countdown, then check if the score is a new high-score, if it is, then save the high-score to the score file, then draw the score to the screen along with the high-score. Then if the restartCD countdown is less than zero then display the “Flap to restart” message on screen. This code should go in place of the command you had that just wrote the score to the screen.

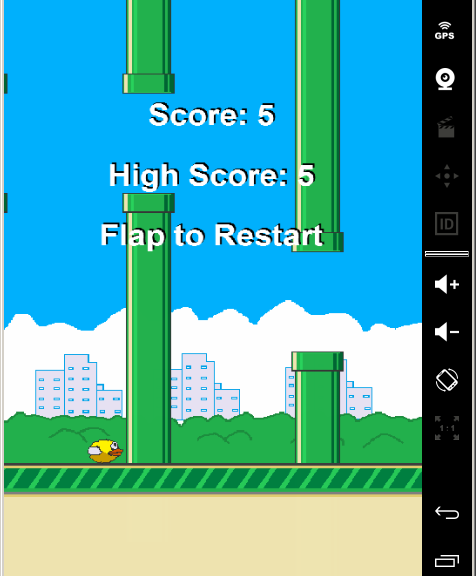
Test it out, you should now see a screen that looks like this when you die:

image

Let’s add some sound:

Simple sound effects are all we need for this game. I’ve used some simple sound effects from a game I made several years ago. I’ve included these in the source code download with this tutorial. If you want to make your own, I’d advise using a simple tool like SFXR. Google “SFXR download” to find it. It’s a simple sound effect generator which is easy to use and has actually been used for commercial games such as VVVVVV which is available on Steam.

To add sounds, we need to define an object for each sound effect, these objects are of type LGSound, add the following lines to the globals section to add an effect for flapping wings and one for dying

Dim snd_hit As lgSound
Dim snd_flap As lgSound


The next step is to point these objects at the sound files, in the LG_Create section, add the following:

snd_hit = lGdx.Audio.NewSound(“shoot.wav”) ‘ load bird hitting object sound
snd_flap = lGdx.Audio.NewSound(“select.wav”) ‘ load flapping sound

These files need to be in your files folder. We’re now ready to use them. Find the section in the LG_Render where the bird hits the ground, insert these commands just before the line that sets birddead to true.

If birddead = False Then
snd_hit.Play
End If

We put this just before the line that sets birddead to true as it means it will only play the sound effect once.

We then add the sound effect for flapping the birds wings. Add this to the IP_Touchdown method just under the line that alters my

snd_flap.Play

so the top of the If statement in the IP_TouchDown method should now read:

If birddead = False Then ‘ and bird alive
myBird.my = 4*scaleY ‘flap wings
snd_flap.Play
Else If birddead = True AND restartCD < 0 Then

The last thing to add is the title screen

This can be done in several ways when writing games, my personal approach is to have a variable that says whether the game is running or not, if it is, then run the main LG_Render loop just as we’ve written it. If it’s not, then display a title screen. To do this, add a gamerunning boolean variable in the globals section:

Dim gamerunning As Boolean = False

We set it as false initially as we want the title screen to show first.

At the start of the LG_Render section, add the following code block:

If gamerunning = False Then
‘increment secs variable
frames = frames + speed
Batch.Begin

‘draw background
Batch.DrawTex2(myBacking,0,vpH*0.20,vpW,vpH*0.80)

‘draw ground tiles
For x = 0 To 6
‘draw each tile over 20%
Batch.DrawTex2(myGD,(x*vpW*0.20)-(frames Mod (vpW*0.20)),0,vpW*0.20,vpH*0.20)
Next

‘draw bird
Batch.DrawRegion3(BirdFrames(0,(birdColour*3)+(frames/8 Mod 3)),myBird.x,myBird.y+(10*Sin(frames/10)),vpW*0.0425,vpH*0.02,vpW*0.085,vpH*0.04,1,1,0)

‘draw title text
shadowtext(“CloneyBird”,vpW*0.5,vpH*0.8) ‘ Cloney Bird title
shadowtext(“Tap to start”,vpW*0.5,vpH*0.7) ‘ Tap to start text
shadowtext(“Get Ready!”,vpW*0.5,vpH*0.5) ‘ Get Ready text
Batch.End

End If
‘END TITLE SCREEN —————————————————————————–

‘MAIN GAME LOOP ——————————————————————————-
If gamerunning = True Then

You also need to add an End if at the end of the main game loop, just after the batch.end command but before the end sub statement.

The above section now needs some explaining. Firstly, it only runs if the gamerunning value is false. And it’s sole purpose is to display a title screen with the game game, a background, a scrolling ground and the prompt to tap the screen to start. So we increment our frames variable just as normal, then draw the background, the floor tiles just as in part 2 to make the ground scroll. We then draw the bird. For the Y coordinate of the bird, I wanted to make the bird bob up and down, the best way to do this and make it look natural is think back to trig class in maths at school, and use the Sin function to add this bobbing motion. If you take the sin value of angle between 0 and 360 then you get a smooth change in values going from –1 to 1, as shown below:

Try running the code now and you should have a fully working game, with a highscore, title screen, sound effects and the ability to restart after you die.

Now it’s up to you what to do next. You’ve got the basics for writing a game using LibGDX and Basic4Android. If you’ve used the trial version to follow this tutorial, then I’d strongly advise to go for the full version, it’s really worth it. You’ll get free upgrades during your licence period and full access to the Basic4Android forums where the community is amazingly helpful and welcoming.

Follow the “Purchase Basic4Android” link on this site to claim a 30% discount off the full price if you do decide to buy.

Thanks for following this series. I hope you’ve enjoyed writing what could be your first Android game and that you’ve leant a lot.

Please contact me if you have any requests for further tutorials, or if you want to point out any errors or improvements I could make to this series.

Happy coding!

Write a Flappy Bird Clone using Basic4Android and LibGDX – Part 5

Part 5 – Adding player input
Grab the source code:
https://dl.dropboxusercontent.com/u/8673694/you%20tube%20files/basic4android/CloneyBirdTutorial/Part5.zip

Now we’re ready to start detecting user input to make the bird flap its wings
We need to setup a method for performing an action when the user taps the screen. This is the IP_TouchDown method. This first needs declaring, just like everything else so let’s declare it in our Globals section just like everything else:

Dim IP As lgInputProcessor

Initialise the object in the LG_Create section with:

‘Sets the InputProcessor
IP.Initialize(“IP”)

We then add the method for handling touches to the screen at the end of our code.

Sub IP_TouchDown(screenX As Int, screenY As Int, Pointer As Int) As Boolean
myBird.my = 4*scaleY ‘flap wings
End Sub

The method accepts screen and screen values which tell us where on the screen the player touched and a pointer value, which tells us how many fingers are touching the screen. We’ll ignore these for now, because we want the bird to flap its wings whenever anywhere is tapped on the screen.
So every time the screen is touched we run the line within the method. We take the mybird.my value and set it to 4 x scaleY. scaleY is set to a value that should cause the bird to set its upwards speed to look the same no matter what the phone screen resolution.
In our LG_Render section, just before the command to draw the bird, we add the code to update the birds Y position:

‘stop bird going too fast
If myBird.my > (-10*scaleY) Then
myBird.my = myBird.my – (0.2*scaleY)
End If
myBird.y = myBird.y + myBird.my

We’ll only adjust the birds my value if the bird’s not going over -10 pixels per frame, this is just to stop it falling too fast. So we’ll say that -10 is our “terminal velocity” in this sense. So assuming my isn’t too low, then we set it my – 0.2*scaleY this applies a gravity value to the my value for each frame. We then update the mybird.y value by the my amount. For each frame the my value goes down by a gravity amount, it gives the impression of the bird dropping. Try changing the gravity value and seeing the effect it has.
Okay, we need to set the bird angle, this calls for a crazy formula loosely based on the my value. Pointing straight to the right is zero degrees. I had a play around with some numbers and came up with this as something that works well. Try playing with this too and see if you can make it simpler. This needs to go just before the draw bird command in the LG_Render section.

birdAngle = (((myBird.my/scaleY)+6)*5.5)+335

We’ll call that it for this session as the collision detection is going to take a little explaining, and I’d like to add scoring in the next tutorial too.
Download the source code here:
https://dl.dropboxusercontent.com/u/8673694/you%20tube%20files/basic4android/CloneyBirdTutorial/Part5.zip

Write a Flappy Bird Clone using Basic4Android and LibGDX – Part 4

Part 4 – Now we add the bird

Grab the source code here:

https://dl.dropboxusercontent.com/u/8673694/you%20tube%20files/basic4android/CloneyBirdTutorial/Part4.zip
This part deals with adding the bird to the game. We’re going to start by adding some variables to our Globals section

Type typbird(x As Float, y As Float, my As Float)
Dim myBird As typbird ‘ holds details for bird, i.e. x, y, my.

First we add a type for the bird object. Our bird will have several properties, an X and Y coordinate and an my value. The my value is how much the bird moves up or down for each frame rendered.
We next set a variable to store the angle the bird should be drawn at depending whether it’s going up or down.
Dim birdAngle As Int = 0 ‘ angle of bird

We then define the texture object that will store our bird images. I say images rather than image as the bird is animated. There are three frames of animation for it to flap its wings. And then there are four colours of bird. So if you look at the bird graphic file as shown here, you’ll see we have 12 frames in the file.

birdframes


First we declare a texture object to load the image file into.
We then declare a region texture object which we will copy the image to before we then split the image into separate frames which we will store in the BirdFrames texture region object.
Dim BirdTexture As lgTexture
Dim BirdRegion As lgTextureRegion
Dim BirdFrames(,) As lgTextureRegion

Lastly we add the following line to store the birdcolour value, this value is used when we draw the bird to select the right frame for the colour value:
Dim birdColour As Int = Rnd(0,4)
Moving onto the Activity_Create method, add the following line to initialise the bird object for use:
myBird.Initialize
Skip to the LG_Create section and add the following lines to load the bird graphics:
BirdTexture.Initialize(“bird.png”)
BirdRegion.InitializeWithTexture(BirdTexture)
Dim BirdFrames(,) As lgTextureRegion = BirdRegion.Split(34, 24)

First we load the bird graphic file into the BirdTexture object. Then we copy the graphic into the BirdRegion object. After this, we use the BirdRegion.Split method to split the graphic into frames that are 34 pixels wide by 24 pixels high. The method will split the graphic into how ever many frames fit this which gives us 12 frames.
We then set the starting cords for our Bird, at 20% in from the left of the screen and 50% up the screen.
myBird.x = vpW*0.2
myBird.y = vpH*0.5

We then move onto the LG_Render method where will draw our bird
‘draw bird
Batch.DrawRegion3(BirdFrames(0,(birdColour*3)+(frames/8 Mod 3)),myBird.x,myBird.y,vpW*0.0425,vpH*0.02,vpW*0.085,vpH*0.04,1,1,birdAngle)

To explain this command, it takes the following parameters:
Image, x coord, y coord, width, height, origin x, origin y, scale X, scale Y, angle
For the image value, we calculate the frame number from 0 to 11 based on the birdcolor value and the frame value. The game runs at around 60 frames per second, so in order to slow the animation down, we devide the frames amount by 8 before taking the remainder after deviding it by 3 we then add it to 3*birdcolour. So if the frame is 25 and the birdcolour is 2, then we get (((25/8) mod 3) + (2*3)). If this is too complex to understand just play with it to see how it works, try removing the birdcolour part to see what gets drawn.
Next we set the x coord based on the birds x value, then the y coord on the mybird.x value.
The origin values mean the position over the bird that the coord is taken from. So we shift this by half the birds width and half the birds height to put this point at the centre of the bird.
The width of the bird is set to 8.5% of the viewport width and the height is set to 4% of the viewport height. So the origin in the centre of the bird needs offsetting by 4.25% and 2%.
The scale values we will leave at 1 and 1 for both width and height, you could change this value if you want to make the bird bigger, but this would then mess with our collision detection we’lll be putting in in the next tutorial. The last value is angle, this is set to the BirdAngle variable. We’ll look at calculating the bird angle in the next tutorial, for now we’ll leave it at zero.
Make sure this is the last thing you draw to ensure the bird is always visible.
We’ll call that it for this part. Try running your code (remember to add the bird graphic file to your files folder), if you get any problems then check the downloadable source code against what you’ve written.
Download the source code!

Write a Flappy Bird Clone using Basic4Android and LibGDX – Part 3

Part 3 – Drawing the pipes

Grab the source code here:

https://dl.dropboxusercontent.com/u/8673694/you%20tube%20files/basic4android/CloneyBirdTutorial/Part3.zip

Now we have basic animation in our game with our scrolling ground tiles, it’s time we add the pipes. First off, in the globals section we’ll add a type to hold the pipe object. An object in programming, is just a collection of variables grouped together under a name, so in this case, each pipe will need and x coord, y coord and whether or not it’s been scored.

Type typpipe(x As Float, y As Float, scored As Boolean)

As we want a delay before each pipe appears, then we’ll declare a pipe countdown variable that we’ll decrease with each frame, when it hits zero we generate a new pipe:

Dim pipeCD As Int = 50 ‘ countdown before pipes start appearing

The pipes will be stored in a list, so we’ll declare that in our globals too:

Dim pipes As List ‘ stores pipes


Lastly we’ll declare our pipe texture:

Dim img_pipe As lgTexture ‘ stores image of pipe

We also need to declare two scale values in globals too:

Dim scaleX As Float’ calculate scaleX compared to set size width

Dim scaleY As Float  ‘ calculate scaleY compared to set size height          

In the Activity Create section we initialize the list of pipes to make it ready to use.

pipes.Initialize ‘ initialise pipes list for new entries

We also now need to set some scale values to allow us to handle different screen sizes with our game.

scaleX = (vpW/400) ‘ set scaleX to allow for different screen sizes

scaleY = (vpH/600) ‘ set scaleY to allow for different screen sizes

The 400 and 600 values were chosen just because that’s what I used as a set resolution when prototyping this game on PC. You can have a play with these values to see how they work.

Next up, in the LG_Create section, add the following line to load t he pipe texture image file:

img_pipe.InitializeWithFile(lGdx.Files.internal(“pipe.png”)) ‘ load pipe image

Okay, now strap yourself in, we’ve got a big code section now to add to the LG_Render section to create pipes:

‘decrease pipe countdown

pipeCD = pipeCD – speed

‘create pipe

If pipeCD < 0 Then

      pipeCD = vpW*0.40 ‘ set pipe countdown 40% of screen width

Dim Pipe Astyppipe’ declare new pipe

Pipe.Initialize ‘ initialise pipe

Pipe.x = vpW*1.20 ‘ set pipe x coord to 120% of viewport width

Pipe.Y = Rnd(vpH*0.35,vpH*0.75)-((img_pipe.Height*0.5)*scaleY) ‘ set y coord to random height

      Pipe.scored = False ‘ set pipe to un-scored

      pipes.add(Pipe) ‘ add pipe to list of pipes

EndIf


Taking this line by line, we first decrease the pipeCD variable by the speed. Then if the pipeCD drops below zero then we make a new pipe. First we reset the pipe countdown to 40% of the viewport width, this means we should end up with three pipes on screen at once. We then define a new pipe to be of object type typpipe, initialize the pipe object and then set it’s x and y coordinates.

The Pipe.X value is set to 120% of the viewport width so the pipe will smoothly appear from the right side of the screen. The Pipe.Y value needs to cause the pipe to appear at a random height on the screen, we’ll set this to anywhere between 35% and 75% of the screen height. We then need to minus half the height of the pipe image to allow for the fact that textures are handled from the bottom left of the image, if we didn’t do this, then the bottom left corner of the pipe would appear at the Y coordinate we specify and we only see the bottom of the pipe. The scaleY value is used here to calculate half the pipe height now that we are scaling the pipe to draw to the screen.

We set the scored value of the pip to false (this will be set to true when the bird passes the pipe). Finally we add the pipe to the list of pipes ready to draw.

‘update pipes

Dim Pipe As typpipe’ declare new pipe

For i = 0 To pipes.Size – 1′ loop through list of pipes

      Pipe = pipes.Get(i) ‘ copy pipe off list onto Pipe object

      Pipe.x = Pipe.x – speed’ decrease pipe x coord

      ‘delete pipe if it goes off left side of viewport

      If Pipe.x < -100 Then

            pipes.RemoveAt(i) ‘delete pipe

            Exit ‘exit loop

      EndIf

Next

For i = 0 To pipes.Size – 1′ loop through list of pipes

Batch.DrawTex2(img_pipe,Pipe.x,Pipe.y,vpW*0.125,vpH*1.33) ‘ draw pipe to viewport

Next


We now update the position of each pipe to make them move across the screen from right to left. To do this, we cycle through the list of pipes using a for loop. For each loop, we assign the next pipe in the list to the pipe object, then alter the x value of the pipe by the speed of the game, this means the pipes will move at the same speed as our ground does.

If the pipe goes off the edge of the right side of the screen then we remove the pipe from the list and exit the loop.

After updating the x position, we then draw the pipe to the screen using the DrawTex2 command by cycling through the pipes again. Note that we set the width of the pipe to 12.5% of the viewport width and height to be 133% of the viewport height.

Now try running the game to see your pipes in action! You should have a background, a scrolling ground layer and pipes appearing around once a second, at random height, smoothly scrolling across the screen.

Get the source code here:

https://dl.dropboxusercontent.com/u/8673694/you%20tube%20files/basic4android/CloneyBirdTutorial/Part3.zip

Write a Flappy Bird clone using Basic4Android and LibGDX – Part 2

Part 2 – Adding the ground in

Get the source code for this tutorial here: https://dl.dropboxusercontent.com/u/8673694/you%20tube%20files/basic4android/CloneyBirdTutorial/Part2.zip

Now we have the basics setup. We setup our graphics surface, load a graphic, and then draw it to the screen each time the device renders the screen. The next thing to add is the ground. In the Flappy Bird game the ground is constantly scrolling from right to left. It’s also a repeated pattern which in nearly all instances in games means that it’s a simple graphic which is drawn several times per frame to give the impression of a continuous surface.

We need to draw and add our ground graphic file to our files folder. In the download lnk, I have already added this and updated the source code to include all extra code in this tutorial.

What code do we need to add?

First we need to declare a new texture to hold our ground graphic. Add the following line the globals section:

Dim myGD As lgTexture ‘ground image

We also need to declare some variables to use to move the ground image for each frame by a set amount and another to control the overall speed of the game. We’ll declare a variable called frames which will hold the frame number we’re on for our game and a speed variable to change how fast the game runs. We’ll make the ground move at the same value as the speed variable for each frame the game renders. This will make more sense when we actually draw the ground image.

So also in Globals, add the following lines:

Dim frames As Float = 0

Dim speed As Float = 3

Notice that it is possible to set a value to a variable at the same time as declaring it.

Next we need to point the mgGD lgTexture object at the actual graphics file, we do this in LG_Create using the following line:

myGD.InitializeWithFile(lGdx.Files.internal(“ground.png”)) ‘ load ground tile image

Next move to the LG_Render section, we’re all ready to draw the ground image now. Before we do that, just change the line that draws the background to the following:

Batch.DrawTex2(myBacking,0,vpH*0.20,vpW,vpH*0.80)

Notice we change some of the values, this is to leave us a gap at the bottom of the screen to draw the ground image. This is to make sure the ground image doesn’t obscure our background image. So it draws the background from 20% up the surface to a height of 80% of the surface which will bring it right to the top of the screen.

Next we need to set our frames variable to increment for each frame drawn. At the beginning of the LG_Render section, add the following line:

frames = frames + speed

This will mean for each frame drawn to the screen, the frames variable will increase by the speed, which currently will give us a sequence of 3,6,9,12,15,19,21,etc….

We are now ready to draw out ground.

Our ground image is to be drawn multiple times in one frame, so the easy way to do this is to use a for loop. A for lop simply starts a new variable at one number, and the increments it after each loop until it reaches another number. Let’s look at our loop to draw our ground images.

After  the line that draws the background, add this group of commands:

For x = 0 To 6

      ‘draw each tile over 20%

      Batch.DrawTex2(myGD,(x*vpW*0.20)-(framesMod(vpW*0.20)),0,vpW*0.20,vpH*0.20)

Next

Right, to explain this, the top line and bottom line just means to take a new variable “x”, set it’s number to zero for the first loop, then one, then two, until it reaches 6 when the loop will end. We then draw the ground image at coordinates that alter based on what X is. We want each ground image to be 20% the width of the screen, so we use the calculation vpW*0.20 to set this value, we then times that by the value of x for each loop, so the result is six images drawn next to each other of the ground graphic. We also minus the frames value from this x coordinate to give the scrolling effect, the part that says Mod(vpW*0.20)simply means to devide the frames amount by 20% the width of the viewport width and return the remainder, this is because the frames value keeps going up each frame, but we want a value returned that is between 0 and the width of the ground graphic, which this gives us.


And that’s it!

Try running it and you should see a smooth scrolling ground under your background image.

Try changing the speed, try different ground images sizes, and maybe try drawing a scrolling ceiling too?


In part 3 I’ll show you how to add the pipes and make them scroll with the ground, and then it’s plain sailing from there to add our bird and get it flapping!!!


Download the source code here:

https://dl.dropboxusercontent.com/u/8673694/you%20tube%20files/basic4android/CloneyBirdTutorial/Part2.zip


Write a Flappy Bird Clone using Basic4Android and LibGDX – Part 1

If this is the first thing you’ve heard of Basic4Android, then welcome! Welcome to the world of easier Android development. Basic4Android (or B4A for short) makes it much easier and faster to get your apps or games up and running. In this series of posts, I will go through the process of writing a simple Flappy Bird style game, using b4a and the brilliant LibGDX games library.

B4A is not free, but is well worth the investment for the benefits it gives you, you can have a simple app written and running on your phone in minutes! Don’t believe me? Check out this video:

You’ll need a full version of B4A to follow this tutorial, but as I said, it’s well worth the investment, and if you buy it through this site, then you will save 30% off the full price!

Anyway, let’s get on with the tutorial…..

by the end of this series, you’ll have written a game like shown in the video below, and have the skills to change it to what ever you want!

Part 1 – Drawing an image

What you need

Basic4Android (obviously)

LibGDX library – Download here

Phone / Tablet that runs Android 3.0 and up

Download the source code for this tutorial here:

Source Code Download

Project Activities

#SupportedOrientations: portrait

It will be much easier for you to write games that just support one orientation, the LibGDX engine can handle the orientation changing, but for simplicity we will stick to one orientation. The Flappy Bird game using portrait, so for our tutorials we will also use portrait.

Activity Attributes

#IncludeTitle: False

Let’s exclude the title bar for the activity, you never see this in games so we don’t want to see it in ours. We’ll keep the status bar at the very top of the screen though so leave the FullScreen option set to false.

Process Globals

We don’t need to declare anything here as our entire game will just be within one module.

Globals

This is where we declare our game veriables, like score, any types we’re using, and anything else we’ll mwant to refer to. This is also where we declare our LibGDX objects.

Dim myBacking As lgTexture

Declaring myBacking as a texture creates a texture in the devices graphics memory, this is where we will store our background image.

Dim surface As View

The surface is where we will draw our libGDX accelerated graphics. We will spread this surface object across the whole screen before we draw on it.

Dim vpW As Float = 720

Dim vpH As Float = 1134

We want to be able to draw to the same screen coordinates to make it easier to write our games. So we will set up a viewport for the camera with the above dimensions. We can then say that drawing to something like 310x by 560y will be around the middle of the screen no matter what device screen we’re running on.

We now setup the LibGDX  objects themselves

Dim lGdx As LibGDX

This line tells B4A to load the LibGDX library, giving us access to the whole LibGDX command set, for drawing our graphics, playing sound effects and handling inputs.

Dim GL As lgGL

This line’s required due to LibGDX using OpenGL to accelerate the graphics functions.

Dim Camera As lgOrthographicCamera

This is our camera that looks at our surface we’re drawing to in order for us to see the graphics we’re drawing. Cameras can be zoomed in and out, rotated and moved around just like a real camera.

Dim Batch As lgSpriteBatch

When drawing our graphics, we’ll use a batch section, this enables LibGDX to draw all the graphics at once which is much faster, and helps LibGDX games run smoothly on older devices.

Activity Create

This is where we initialise our LibGDX graphics engine and tell Android where to draw it

surface = lGdx.InitializeView(“LG”)

The above line has changed after a recent library update, if you are running version 0.95 or earlier of the libGDX library then use: surface = lGdx.InitializeView(true,”LG”)

Activity.AddView(surface, 0, 0, 100%x, 100%y)

So we initialise the surface object as a lGdx view with the name LG. We then add this view to the activity filling the whole screen excluding the status bar as the activity property is set to non-fuillscreen.

Activity_Resume

This simply tells the LibGDX engine to resume running if it’s been initialised previously.

Activity_Pause

Here we tell the LibGDX engine to pause if it’s been initialised previously.

LG_Create

This is where we load any graphics or sounds for our game and initialise any other objects we need. In our example here we Initialise the sprite batch for drawing graphics in our main render method, we also load the png graphics file into our myBacking texture ready to draw to the screen.

myBacking.InitializeWithFile(lGdx.Files.internal(“day_background.png”))

This file must exist in your files folder within the project folder. The file can be any size and resolution as LibGDX will scale it to match what ever scale we draw it to. Obviously, the smaller the image then the less memory it will take to draw it. So if you’re planning on a game that has a lot of graphics then you’ll want to keep those graphics file sizes down.

LG_Resize

This is called when the surface changes size, mostly this is when the orientation changes. As we’ve set our activity to only support portrait then this won’t be called at all.

LG_Render

This is the meat of our game! This is where we draw the actual game to the screen!

We start by clearing the screen

GL.glClearcolor(0,0,0,1)

GL.glClear(GL.GL10_COLOR_BUFFER_BIT)


We set the clear colour, this is set using Red,Green,Blue,Alpha values between zero and one. So here we are just setting it to a totally black screen with no transparency. We then call the command to clear the screen.

We call the camera update command.

Set the batch projection matrix to match the camera combined type. I’m not going to try to explain how this line works, as I don’t honestly, know, all I can say is it makes the graphics commands we use in our batch match the screen coordinates of the viewport we configured earlier.

We then start the batch section to draw the graphics.

Batch.DrawTex2(myBacking,0,0,vpW,vpH)

This line tells LibGDX to draw the myBacking image to the screen, starting at 0,0 (the bottom left of the screen) to the top left of the screen at vpX,vpY

We then finish the batch.

There is then the LG_Pause, LG_Resume, and LG_Dispose methods are declared to handle those events. We’re not covering using these in this tutorial.

Download the source code here!

https://dl.dropboxusercontent.com/u/8673694/you%20tube%20files/basic4android/CloneyBirdTutorial/Part1.zip

Proceed to the next tutorial:

Part 2 – Adding in the ground

Flappy Bird clone LibGDX version

I’ve finished the first version of my Flappy Bird clone using the LibGDX library with Basic4Android. Download the source code here:

Cloney Bird LibGDX Source Code

I’m planning on making a short Youtube series on how this all works.

Currently sound does not work but this will be fixed shortly.

UPDATE: I’ve written a complete series of tutorials showing how to write this.

Read them here